
Quick Links
- What are tags and classifications?
- Why use tags and classifications?
- Who can manage classifications?
- Accessing classification settings
- Setting up ratings
- Setting up tags
- Setting up flags
- Setting up experiences
- Saving your classifications
- Assigning classifications to suppliers
- Adding ratings
- Adding commission information
- Adding flags
- Adding tags
- Adding experiences
- Adding internal notes
- Marking preferred suppliers
- Toggling between suppliers
- Saving supplier classifications
- Viewing classifications in Product Manager
- Best practices for classifications
- Team training
- Common use cases
- Troubleshooting
- Need help?
What are tags and classifications?
Organise and filter suppliers using customisable classifications:
Ratings:
- Internal quality scoring (e.g., Premium, Standard, Budget)
- Budget categorisation
- Custom rating system for your company
Tags:
- Product characteristics (Eco-friendly, Family-friendly, Romantic)
- Filter options in Product Manager
- Customisable to your needs
Flags:
- Important alerts displayed next to supplier names
- Visible warnings or highlights
- Critical information for consultants
Experiences:
- Key activities sold (Safari, Beach, Cultural, Adventure)
- Filter by client interests
- Match products to requests
Why use tags and classifications?
For your team:
- Quick supplier filtering
- Match products to budgets instantly
- Identify key characteristics at a glance
- Consistent quality standards
- Faster itinerary building
For business efficiency:
- Streamline booking processes
- Reduce research time
- Improve product alignment with client needs
- Better margin management
- Consistent service standards
Who can manage classifications?
Admin users can customise ratings, tags, flags, and experiences.
All users can view and filter by these classifications in Product Manager.
Privacy: This information is only visible within your account. No other Wetu users or travellers can see it.
Accessing classification settings
Method 1: Via Product Manager
1. Open Product Manager
2. Find any supplier
3. Click "Customise" option
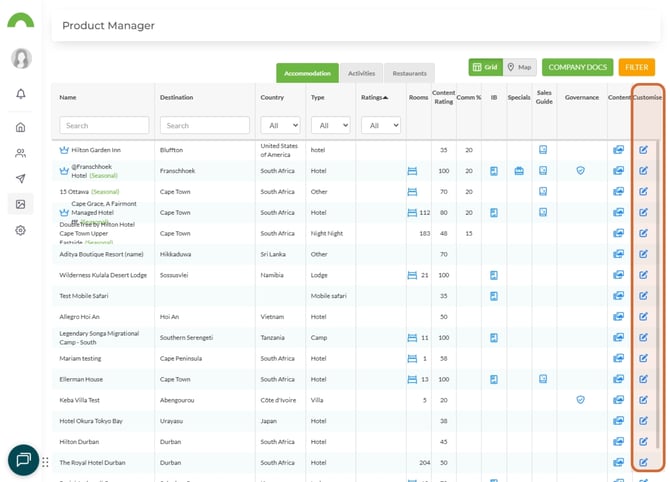
This opens the Supplier Options in Account Settings.
Method 2: Direct from Account Settings
1. Navigate to Setup > Account
2. Open "Supplier" tab
3. Click "Manage Ratings & Tags"
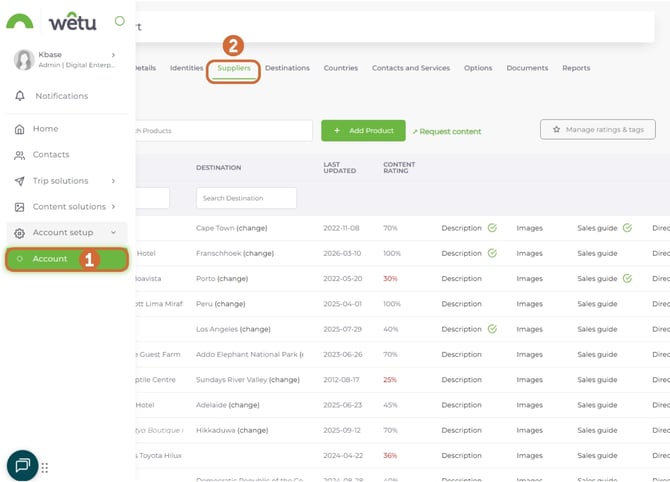
This is where you tailor classifications to your company needs.
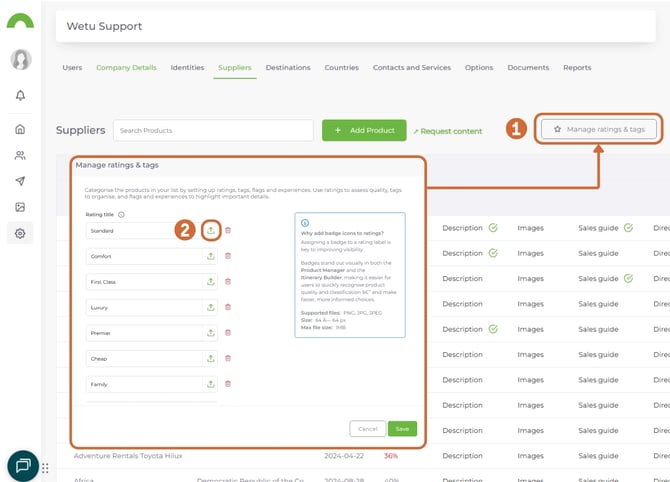
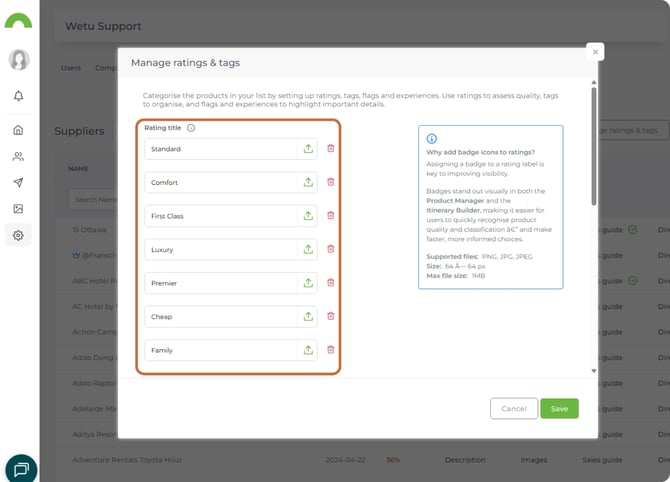
Setting up ratings
Upload rating icons
1. In Ratings section, upload icons for each rating level
2. Icons display in Product Manager for visual recognition
3. Recommended size: 50x50 pixels or similar
Visual cues help consultants identify ratings quickly.
Customise rating names
Examples:
Budget-based:
- Luxury
- Upper Mid-Range
- Mid-Range
- Budget
- Economy
Quality-based:
- Premium
- Standard
- Basic
Star-based:
- 5-Star
- 4-Star
- 3-Star
Custom:
- Platinum
- Gold
- Silver
- Bronze
Add additional ratings
1. Click in the box titled "Enter a rating"
2. Type your rating name
3. Upload icon for the rating
4. Add as many levels as needed
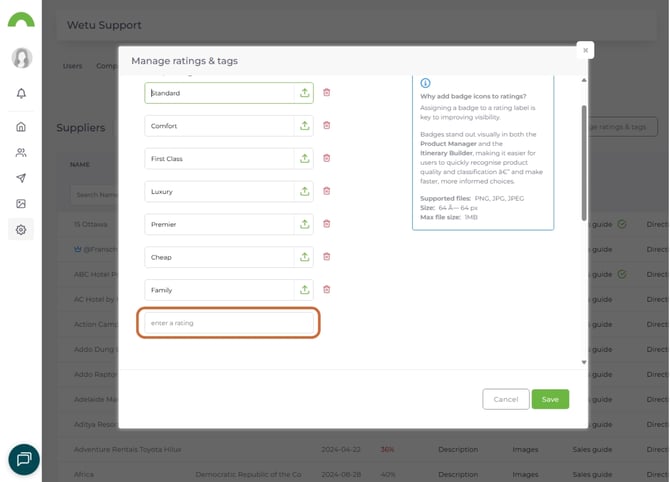
Keep it simple: 3-5 rating levels work best for most companies.
Setting up tags
Tags are used as filters in Product Manager to identify important product characteristics.

Create useful tags
Property characteristics:
- Eco-Certified
- Family-Friendly
- Honeymoon-Suitable
- Pet-Friendly
- Wheelchair-Accessible
- Adults-Only
- All-Inclusive
Location features:
- Beachfront
- Mountain View
- City Centre
- Remote/Secluded
- Game Reserve
Special features:
- Spa on Site
- Conference Facilities
- Private Pool
- Butler Service
- Chef on Site
Add, edit, or delete tags
Add new tag:
1. Scroll to bottom of Tags section
2. Click in the titled box "enter a tag"
3. Enter tag name
4. Save
Edit existing tag:
1. Click on tag name
2. Modify text
3. Save changes
Delete tag:
1. Find tag to remove
2. Click delete icon
3. Confirm deletion
Setting up flags
Flags display next to the profile name in Product Manager for critical visibility.
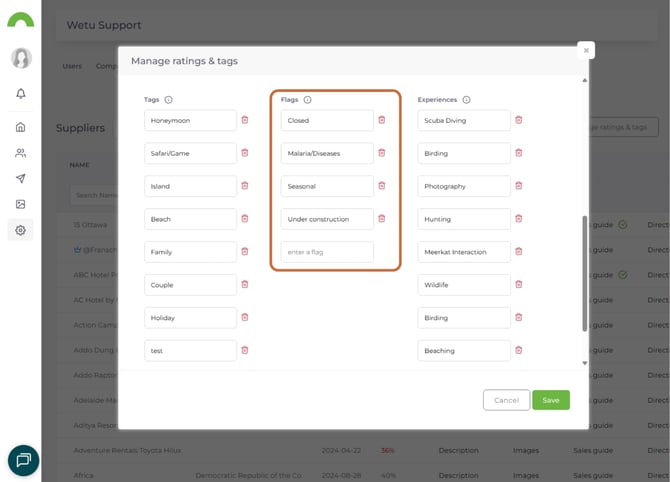
Create useful flags
Warnings:
- Slow Response Time
- High Cancellation Fee
- Strict Payment Terms
- Limited Availability
Highlights:
- Best Commission
- Exclusive Contract
- Priority Partner
- Recently Inspected
Operational:
- Requires Deposit
- Direct Contact Only
- No Online Booking
- Blackout Dates Apply
When to use flags
Use flags for information that:
- Consultants need to see immediately
- Affects booking decisions
- Requires special handling
- Impacts client experience
Don't overuse: Too many flags create visual clutter.
Setting up experiences
Experiences help identify key activities you sell so consultants can match products to client requests.
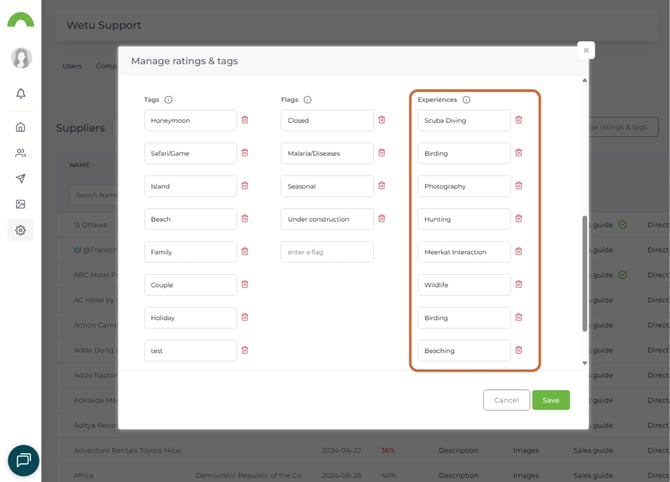
Create relevant experiences
Activity types:
- Safari/Game Drives
- Beach & Watersports
- Cultural Tours
- Adventure Activities
- Wellness & Spa
- Food & Wine
- Wildlife Experiences
- Photography Tours
Destination types:
- National Parks
- Coastal Resorts
- Mountain Lodges
- Urban Hotels
- Island Retreats
Special interests:
- Birding
- Conservation
- Community Tourism
- Luxury Travel
- Budget Adventures
How experiences work
As filters in Product Manager:
1. Consultant receives client request for "Safari and Beach"
2. Filters Product Manager by these experiences
3. Sees only suppliers offering both
4. Builds itinerary faster
Saving your classifications
After setting up ratings, tags, flags, and experiences:
1. Review all entries
2. Click "Save"
3. Changes apply immediately
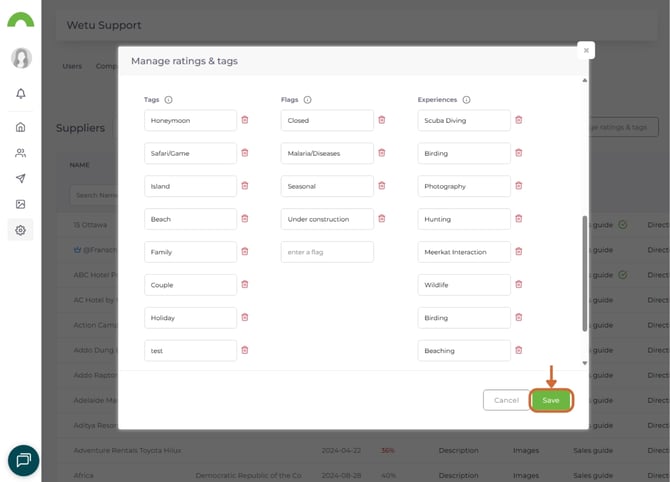
You can now assign these to relevant suppliers.
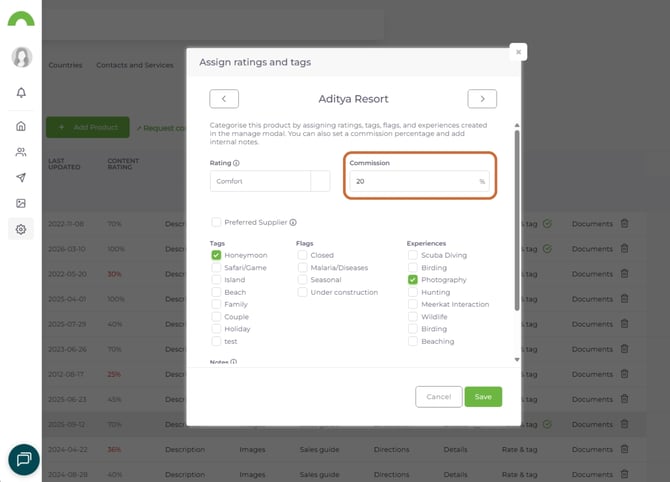
Assigning classifications to suppliers
Access supplier settings
1. Stay in Supplier Tab (Account Setup)
2. Search for the supplier you want to update
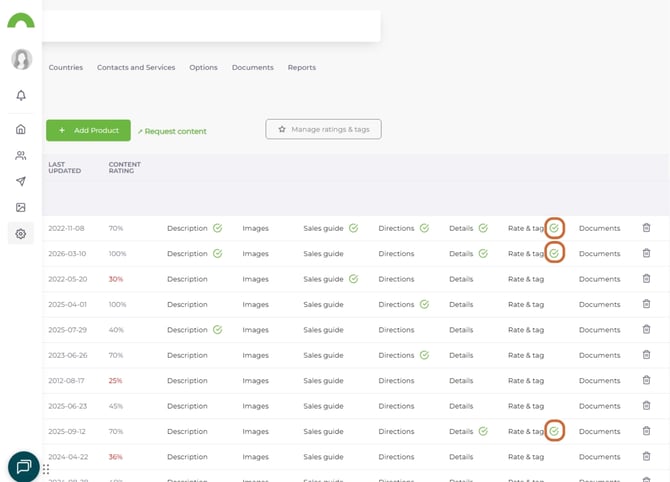
3. Click "Rate & Tag"
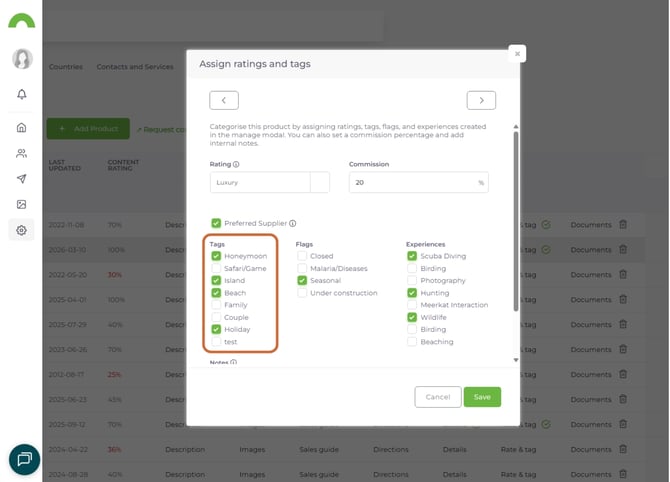
The Rate & Tag panel opens.
Adding ratings
Select the product rating you created in settings.

Why rate suppliers:
- Help new consultants match products to budgets
- Ensure consistent quality standards
- Quick visual identification
- Align with traveller needs
Example:
- Client has luxury budget → Filter for "Luxury" rated suppliers
- Client budget-conscious → Filter for "Mid-Range" suppliers
Adding commission information
Enter the commission percentage negotiated with the supplier.
Benefits:
- Quick visibility when building itineraries
- Swift margin and mark-up decisions
- No searching through contracts
- Accurate profit calculations
- Team-wide commission knowledge
Example:
"15%" or "12.5%"
Update regularly when commissions change.
Adding flags
Select applicable flags from your list.
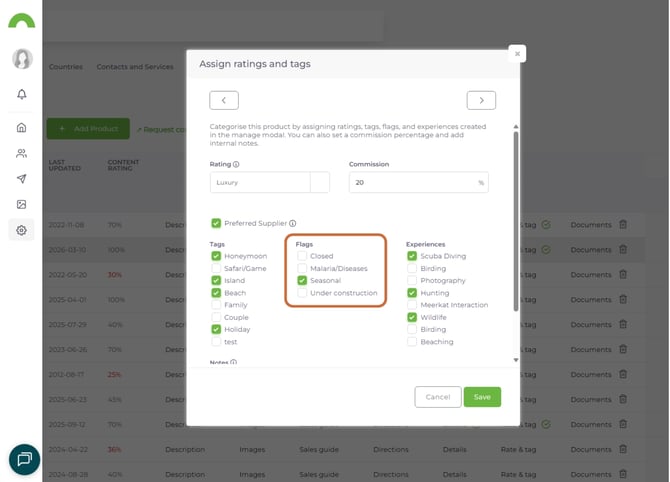
Multiple flags can be added to one supplier.
Example:
A supplier might have:
- ⚠️ Requires Deposit
- ⭐ Best Commission
Both flags display next to their name in Product Manager.
Adding tags
Select relevant tags for the supplier.
Example:
For a family-friendly eco-lodge near a beach:
- Eco-Certified
- Family-Friendly
- Beachfront
- Spa on Site
All become filterable in Product Manager.
Adding experiences
Select experiences this supplier offers.
Example:
Safari lodge might offer:
- Safari/Game Drives
- Wildlife Experiences
- Photography Tours
- Cultural Tours
Consultants can filter for these when building safari itineraries.
Adding internal notes
Add internal notes for your team.
What to include:
- Booking procedures
- Special requirements
- Contact preferences
- Payment terms
- Blackout dates
- Historical issues
- Client feedback themes
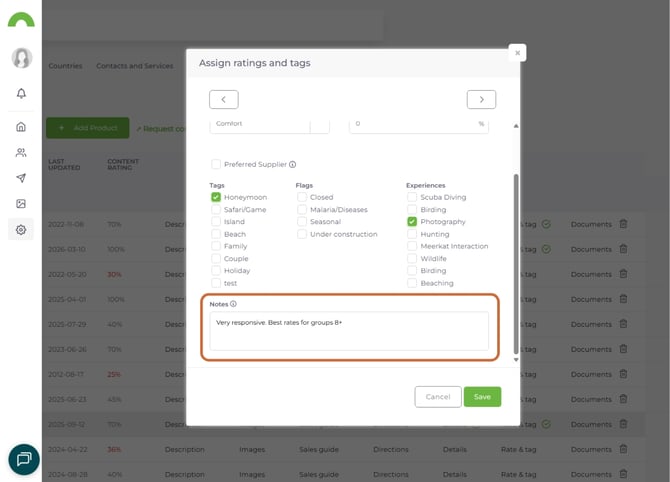
Example:
Contact: Sarah Johnson (sarah@property.com)
Booking: Requires 30% deposit within 48hrs
Payment: NET 30 from check-out
Notes: Very responsive. Best rates for groups 8+
Avoid: Dec 20-Jan 5 (fully booked annually)
Internal notes visible in Product Manager when viewing supplier content.
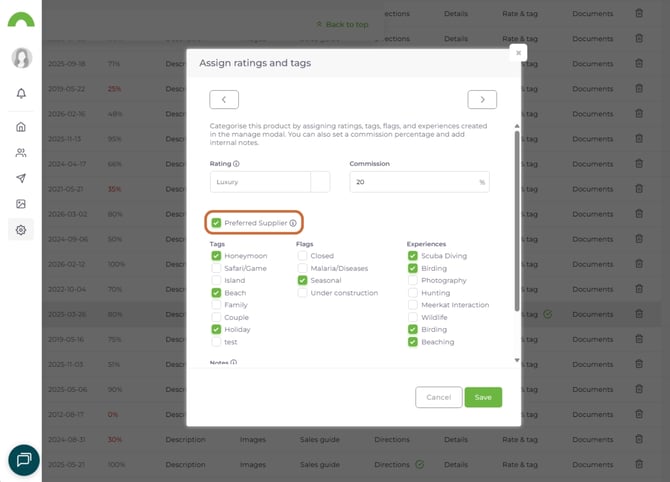
Marking preferred suppliers
Tick the checkbox to add the crown icon indicating a preferred supplier.
Why mark preferred:
- Priority consideration
- Best partnerships
- Reliable service
- Strong commission
- Quality assurance
Crown icon displays next to supplier name in Product Manager.
Toggling between suppliers
Use arrows next to the supplier name to move between suppliers without closing the panel.
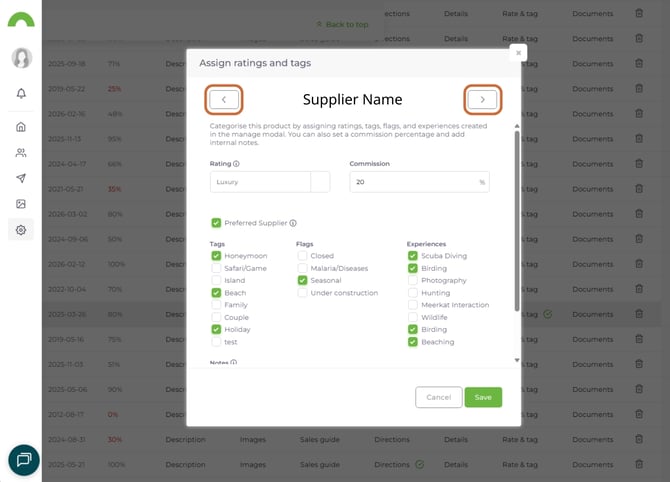
Efficient for updating multiple suppliers quickly.
Saving supplier classifications
Click "Save" after adding all information.
A green tick icon appears next to "Ratings & Tags" confirming changes saved.
Viewing classifications in Product Manager
Flags and preferred supplier icon
Displayed directly next to profile name:
- Flags you've set
- Crown icon (preferred supplier)
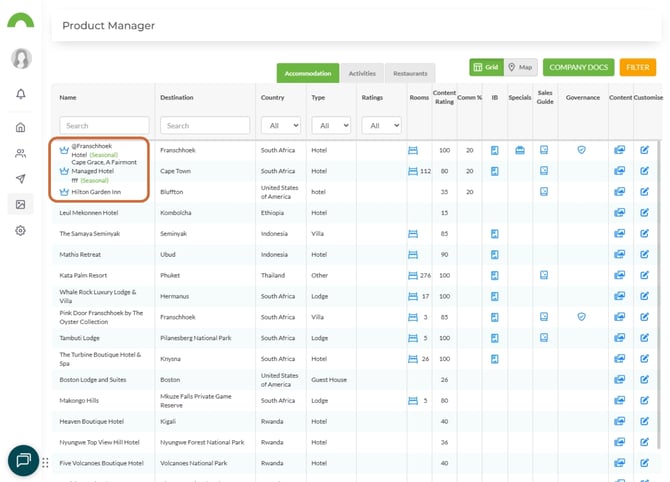
Instant visibility of critical information.
Internal notes
Click "Content" icon to open supplier details.
Internal notes appear below the information section.
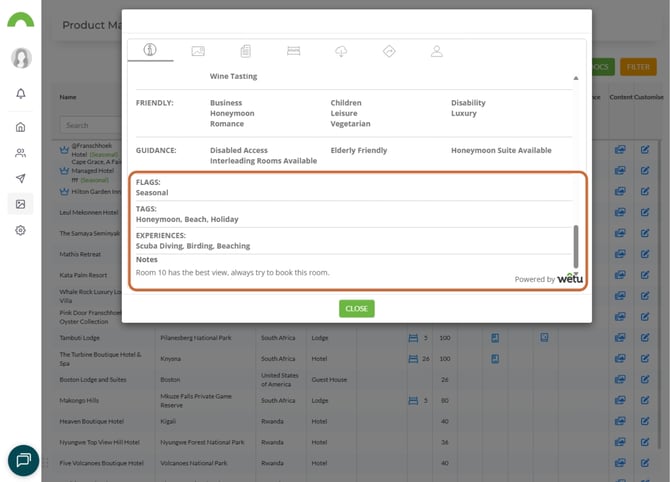
Your team sees notes immediately when researching suppliers.
Filtering by classifications
Click "Filter" to access classification filters.
Filter by:
- Ratings - Specific quality/budget levels
- Tags - Product characteristics
- Flags - Important alerts
- Experiences - Activities offered
Commission visibility
Commission percentage displays in Grid view.
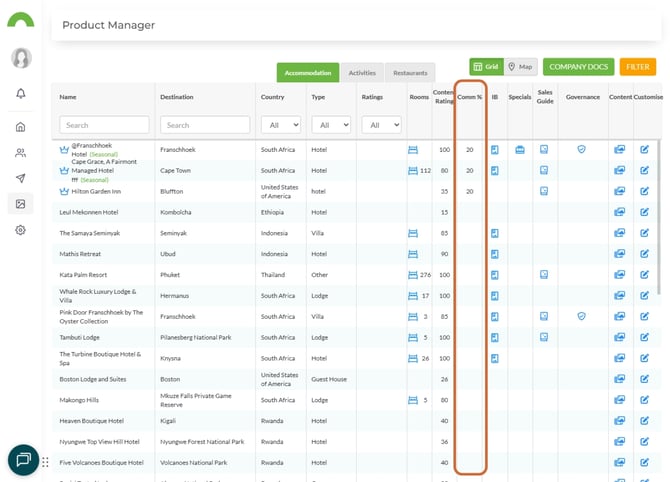
Easy visibility for margin decisions during itinerary building.
Best practices for classifications
Keep it consistent
Rating system:
- Use same criteria for all suppliers
- Document what each rating means
- Train team on rating standards
- Review ratings annually
Tags:
- Use consistent terminology
- Avoid redundant tags
- Keep tag list manageable (15-20 max)
- Archive unused tags
Use flags sparingly
Effective flag use:
- Maximum 2-3 flags per supplier
- Reserve for critical information
- Remove flags when no longer relevant
- Use clear, concise language
Ineffective:
- Too many flags (visual clutter)
- Vague flags ("Check details")
- Outdated flags
Make tags specific
❌ Too vague: "Good for families"
✅ Specific: "Family-Friendly" (as a defined tag)
❌ Too broad: "Nice property"
✅ Specific: "Boutique," "Luxury," "Adults-Only"
Update regularly
Monthly:
- Review commission rates
- Update internal notes
- Add new suppliers
Quarterly:
- Audit ratings for accuracy
- Remove unused tags/flags
- Update preferred supplier list
Annually:
- Full classification system review
- Clean up redundant tags
- Retrain team on system
Team training
Train on classification system
For new consultants:
1. Explain rating system and criteria
2. Show how to filter by tags
3. Explain flag meanings
4. Demonstrate experience filters
5. Review commission visibility
For all team:
- Document classification definitions
- Create quick reference guide
- Regular refreshers on system
- Share updates when classifications change
Create internal documentation
Classification guide should include:
Ratings:
- What each rating means
- Budget ranges
- Quality standards
- Examples
Tags:
- Full tag list with definitions
- When to use each tag
- Examples of tagged properties
Flags:
- What each flag means
- When flags are added
- Action required for each flag
Experiences:
- Activities included
- How to filter effectively
- Example searches
Common use cases
Use Case 1: Budget-conscious client
Client: Family of 4, mid-range budget, needs family-friendly beach resort.
Use classifications:
1. Filter by Rating: "Mid-Range"
2. Filter by Tag: "Family-Friendly" + "Beachfront"
3. Filter by Experience: "Beach & Watersports"
4. Check commissions for best margin
5. Select top options
Result: 3-4 perfectly matched properties in seconds.
Use Case 2: Luxury safari
Client: Honeymoon couple, high budget, eco-conscious, photography focus.
Use classifications:
1. Filter by Rating: "Luxury"
2. Filter by Tag: "Honeymoon-Suitable" + "Eco-Certified"
3. Filter by Experience: "Safari" + "Photography Tours"
4. Check preferred supplier status
5. Review internal notes for booking tips
Result: Exclusive, eco-certified safari lodges with photography guides.
Use Case 3: Group booking
Client: Corporate group, 15 pax, needs conference facilities and team-building.
Use classifications:
1. Filter by Tag: "Conference Facilities"
2. Filter by Experience: "Team Building" or "Adventure Activities"
3. Check flags for "Requires Deposit" or "Group Rates"
4. Review internal notes for group booking procedures
5. Check commission for group bookings
Result: Suitable venues with correct facilities and booking requirements.
Troubleshooting
Classifications not appearing in Product Manager
- Ensure you saved after creating them
- Refresh Product Manager
- Check you're logged in as correct user
- Clear browser cache
Can't edit classifications
- Verify you have Admin access
- Contact account owner for permissions
- Try different browser
- Log out and back in
Tags/flags not filtering correctly
- Ensure tags applied to suppliers correctly
- Check filter selections
- Verify suppliers actually have those classifications
- Refresh page
Commission not displaying
- Check commission added in Rate & Tag panel
- Ensure saved properly
- Switch to Grid view (commission doesn't show in all views)
- Refresh Product Manager
Internal notes not visible
- Click "Content" icon to open details
- Scroll to information section
- Notes appear below supplier info
- Refresh if not showing
Need help?
For classification setup:
- Email: support@wetu.com
- Live chat: Available in your dashboard
For Admin access:
- Contact your account owner
- Or email: support@wetu.com